So you want to be a blogger?
I’ve been blogging for nearly seven years here at One Day in a City and it has opened amazing doors for me as well as provided me an income stream. Over the years, I’ve done a lot of trial and error and research to learn the best ways to run a successful, profitable blog. How you start your blog from the very first day can provide a massive shortcut to this type of success so today I’m sharing those tips with you.
This post contains affiliate links, which means I get a small percentage of any sales made through those links at no extra cost to you, which helps me cover the costs of running this site. Also, pro tip: keep this affiliate stuff in mind for after you start your own blog. 😉
First Step in Starting a Blog? Choose a Name and Purchase a Domain

What’s in a name? Well, a lot if you’re a blogger!
Unfortunately, finding the right name is one of the most frustrating parts of being a blogger, particularly nowadays when it seems all the good names are taken…meaning the URL is not available.
But you want to start a blog, right? So there must be some creative juices flowing through your veins. Tap into that creativity, do some brainstorming (I always like putting pen to paper for these types of brainstorming sessions) and you’ll come up with the right name.
Once you have your blog name, check if the domain is available, i.e. www.MyBlogName.com. If it’s available, purchase it before it’s gone. URLs seriously can be available one day and gone the next so don’t delay if you found your perfect name. And domains typically run only about $9.99 so it’s worth it to claim even if you end up changing your mind later.
Also, if you’re for sure set on your name and it’s available, you can often get the domain for free by registering for it when you sign up with a hosting company to host your blog.
Wait, you may be saying…what’s this hosting business I need to start a blog?
Let me explain.
Self-Hosting Your Blog with WordPress
If you are going to be even remotely serious about blogging (meaning using it as more than just a journal for your thoughts), it’s important to self-host. What this means is instead of using a platform like Blogger, you download software that is customizable. The predominant software of choice is WordPress. (Make sure you go to WordPress.org. There is also a WordPress.com that functions similar to Blogger and I’d avoid this since if your blog takes off it’s inevitable that you’ll end up switching to the .org software version.)

There are other self-hosting platforms you can use (you might see the word Squarespace thrown around in blogging communities), but WordPress is the way to go in my opinion (and most professional bloggers opinions) as there are so many resources surrounding it, particularly in the form of plug-ins (more on that later).
This software needs to live somewhere so unless you’re a programming genius with the hardware to store it, you need to use a third party hosting company. This is where things get complicated. There are sooooo many hosting companies out there. Keep in mind I started blogging seven years ago and back then the predominant hosting company to use was Bluehost. There also weren’t as many bloggers so the service was awesome and the site uptime was near perfect. But as the years passed and blogging became more prevalent and Bluehost’s business grew, I started to have some frustrations and wanted to find a smaller, more service-oriented hosting company.
Setting Up Blog Hosting with Siteground
I’d been hearing about Siteground for months and how easy it was to set up hosting with them, and how amazing and dedicated their service team is. So I switched.
Why did I switch to Siteground and why do I think you should use Siteground to host your blog? For these three main reasons:
- Service: As I already mentioned, Siteground’s service is top-notch. Immediately upon signing up, you’ll get emails with an account team to reach out to if you have any issues. They are also quick about getting back to support tickets, typically within ten minutes. And the online chat time is instant (I had to wait up to 30 minutes to chat with someone at Bluehost in the past couple years.)
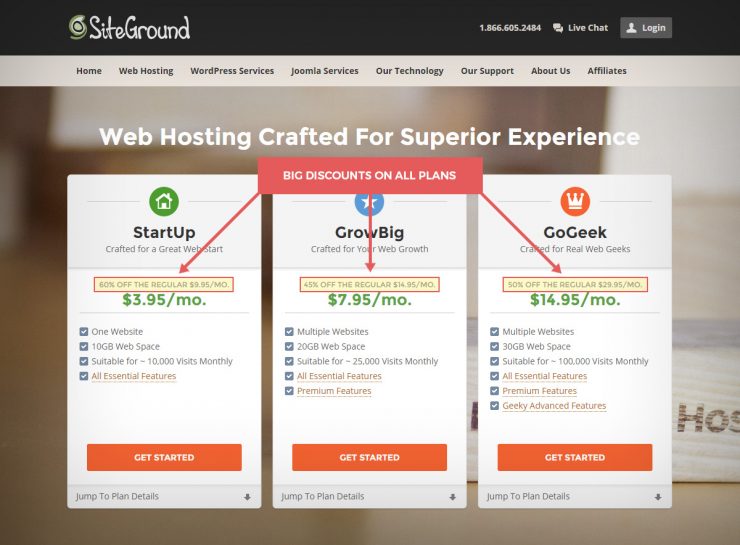
- Price: If you’re just starting out, you’ll likely want to do shared hosting as it’s the most affordable way to host your site, and Siteground has competitive pricing starting at $9.95 a month for the basic plan (the StartUp package) or $14.95 a month if you need more space (the GrowBig package). You can read more about Sitegrounds’ hosting plans here. But one more thing about that price…
Sign up today and you can save up to 60% which brings the price down to $3.95 or $7.95 per month. (That’s basically the price of an espresso drink depending what you order at Starbucks.)
Ready to get hosted by Siteground? I’d so appreciate if you use this link to do so, which is my affiliate link – I get a small commission if you sign up through this link so you would be helping to support One Day in a City which helps me to continue to bring you time-maximizing travel and career advice!
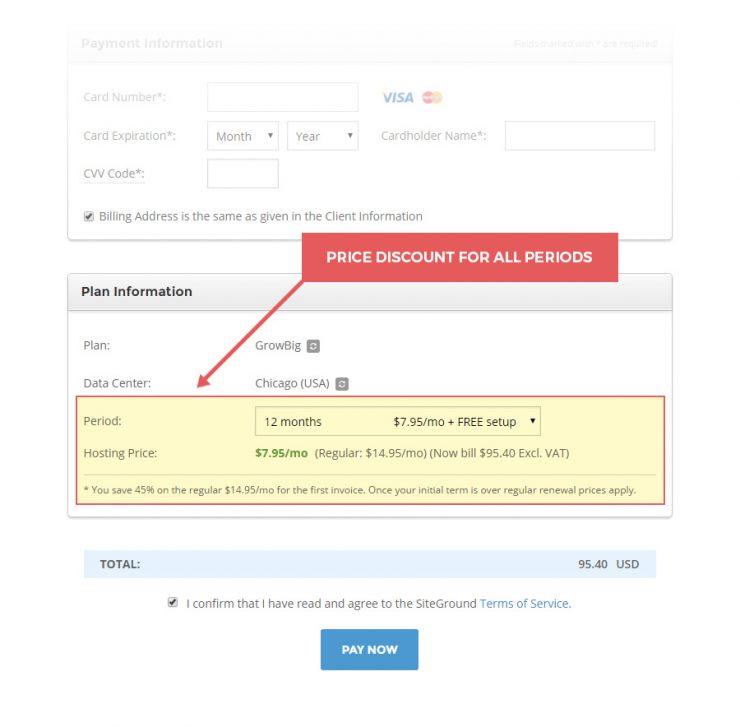
Oh, and one more thing that makes Siteground stand out from a pricing perspective — other hosts offer bigger discounts if you choose multi-year plan commitments. With Siteground, the discount is the same whether you choose a year plan or three year plan. Which is awesome and much easier on the pocketbook.
Start Your Blog on the Right Foot with the Right Template
Choosing a template and framework is important for your blog. It can have a big affect on user experience and how likely people are to stay on your blog and come back to it. It can even affect SEO and how likely your blog is to show up in search engines. There are many free templates available and even the yearly WordPress theme (which is free) is optimized for SEO and mobile.
However, if you want a more professional looking blog and one that is easy to customize and make your own, without sacrificing a ton of time figuring out code (or messing up code), it’s wise to put in a small investment when you first start your blog to make it look and function the way you want from the beginning. Changing themes is pretty easy, too. I really like Studiopress’ Genesis framework and corresponding themes. I had a different theme when I first launched my blog and found it clunky and hard to use. I love how much more streamlined my site looks now with my Genesis theme. Plus, after installing the framework to go with it, my monthly visits from Google jumped – thanks SEO! It was annoying and time consuming to switch themes, though, and I still haven’t updated all of my picture widths on old blog posts, so I recommend choosing a good one right from the moment you start your blog.
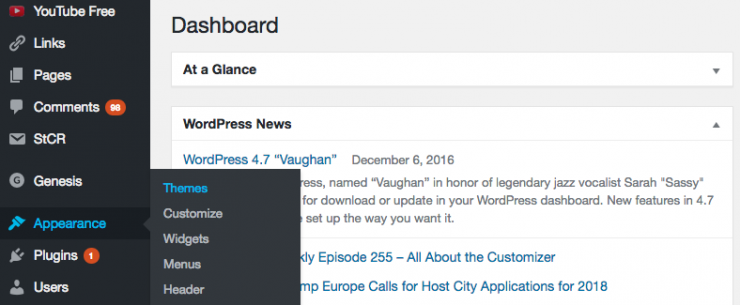
Adding a Studiopress theme is pretty simple, too. Just got to Appearance — Themes in your WP Dashboard sidebar (shown above). Click on the “Add New” button, and then upload the theme you purchased.
What’s the Deal with Plugins and Why Do You Need Them to Start Your Blog?
I mentioned earlier WordPress is the way to go because of the plug-ins you can add. These are often free tools you can add to make your blog run better, do a particular action effortlessly (like social sharing icons), or look a certain way. Your WordPress dashboard will have a plugin section where you can search for plug-ins and immediately download them. Here are some of the best plug-ins to download.
Yoast SEO: Assists you in setting up your blog posts to be SEO-friendly and will tell you what SEO components are missing.
Akismet: Helps filter out spam comments (which can become quite time-consuming to go through and annoying).
Category Order: Depending on your WordPress theme, you’ll probably want to add this to make it easier to drop and drag and sort your categories the way you want in your menu header.
Ultimate Social Media: Not satisfied with your theme’s social icons? Download this plugin, which has customizable social media icons that link through straight to your social media profiles.
What You Must Include On Your Blog From Day One
Here are some blog must-haves you can’t forget to include when starting your blog.
Clear and Concise Menu Bar
The categories that show up in your menu navigation bar are some of the first clues to visitors of what your blog is about. Less is more with this. Don’t overwhelm the reader with a ton of different options. I recommend choosing five to seven main topics to include in your menu with clear subcategories if you’re including drop-downs for these main menu categories.
For example: If you focus on travel in the West Coast of the USA, don’t put “My Favorite Spots” and “Destinations” as category headers, put “Best of the West Coast” and possibly the states: “California,” “Oregon,” and “Washington.” That immediately tells your reader what your blog is about. (I do have a Destinations menu item because I cover short on time travels around the world so menu categories are definitely something dependent on your niche.)
About Section
Make sure it is easy for the reader to find out who you are and what you’re all about. Whether this is a quick blurb in the sidebar, a prominent spot in the main menu, or a homepage funnel dedicated to telling visitors who you are and why they should care, the “About” part of your blog is a big way to build a relationship with readers and keep them coming back.
Social Media Icons
Make sure readers can easily find you on social media by providing icons they can click on to take them immediately to their desired choice of social platform .Also, as soon as you have a blog name, register that name with all social media sites even if you’re not using a particular social platform yet. The good names go fast.
Your Mailing List = Your Blog’s Future
One of the best things you can do for yourself as a blogger from day one is to put a focus on growing your email list. It might seem pointless to have a newsletter sign-up when you are just starting out and averaging about 10 visitors a day, but those 10 visitors may be passionate readers who want to keep hearing about your stuff. And as your list grows and your traffic grows, suddenly you’ll find you have a decent sized list of people who love you and your brand and that you now have a direct line of communication to thanks to being able to email them.
But since the majority of websites have such a newsletter opt-in, readers eyes tend to automatically ignore them. Therefore, you need something enticing to convince them to hand over their email address after they’ve already decided they like what you have to say. This can be a free eBook, email course, packing checklist, etc. – something your readers will find helpful that is specific to your niche.
But…how do you get all this to the readers, set up the opt-in form, make sure their name gets on your list, then actually send them an email, and stay compliant (email marketing has lots of rules), and…and…and…
The answer? Convertkit. This is one of the best investments you can make in yourself as a blogger if you’re hoping to turn your blog into a business. One thing I wish I’d figured out sooner is that if you want your blog to be your business then you need to treat it like a business – and what small business do you know of where you don’t have to put at least some money into it at the beginning before you’re making a profit?
Convertkit is an email platform designed specifically for bloggers. It has an excellent support team and makes email sign-ups and marketing a breeze. Convertkit’s interface is straightforward and super simple to use. Here are just a few of the things you can do with it:
- Send your content upgrade easily after someone signs up.
- Manage different lists and segments (for example, one segment might be people who signed up for your list on a post about Europe while others did so on a post about USA Travel – you can easily send them specific email content about each of those destinations — and only the destination they were reading about — thanks to Convertkit.)
- Easy to implement forms (Convertkit’s free plugin makes putting forms directly into your posts a breeze).

When you’re just starting out, Convertkit is only $29/month. It’s worth it. You’ll be starting your blog the right way and be on your way to a profitable blogging career.
Once you’re ready to sign up for Convertkit, I’d so appreciate you using this link, which is my affiliate link and costs nothing extra to you, but helps me cover the costs of running this site. Thanks so much for supporting One Day in a City!
Be Patient When Starting Your Blog
Lastly, be patient. Turning blogging into something you can make money from or get free products through takes time. I was blogging for a couple years before I got my first complimentary hotel stay and I waited five years before I decided to start monetizing my blog (other than my eGuidebooks) because I so wanted to make sure I did it right and not rush something that might turn off my readers. In the beginning, focus on the content and the relationship with your reader – what can you do to help improve the life of your readers? Answer that question and commit to show up every day to your blog and you will find your blog begins to flourish. However, I’m not patient either so here are some ways to speed up the process:
- Social Media: This book really helps you grasp the right mindset to be in when using social media as a promotion platform and relationship builder.
- Search Engines — Google and Pinterest: That’s right, Pinterest, too – it’s much more of a search engine than a social media platform. Study up on keyword tactics for both Google and Pinterest, and become adept in using the free image creation tool, Canva, for Pinterest images.
- Regular Posting Schedule: Whether you post once a week or five times a week, pick a day and keep it consistent.
- Email List, Email List, Email List (You didn’t skim over the Convertkit section, right?! 😉
Good luck with starting your blog! You’re ready to begin a fun journey with the possibility for amazing opportunities.
Once you’re launched, please come back here and leave me a comment with what you found most helpful in starting your blog and what the link to your blog is so I can check it out! Happy Blogging!


